Arch Linux Installation with Fulll Disk Encryption + (Secure Boot, TPM2, UKI and more)
7 minutes read •
1. Verify ISO
- Verify the hash of the iso image file. We can use either the following two commands.
# Inside the directory of the downloaded iso
or,
- Verify the signature so that we make sure that we have downloaded the iso from the original author instead of a malicious actor.
# First download and import the pulic key in order to verify the signature
# Then verify
2. Connect to the WiFi if not using Ethernet
We can use nmtui which is a terminal user interface. Also we can use iwctl with which we can connect to the WiFi using the following commands.
# Enter the iwctl command environment
# List available wifi devices
# Connect to the wifi
# It will prompt us to enter the passpharse. SO, enter the passphrase of the wifi.
3. Steps to connect with ssh
# Start the sshd daemon
# Create a password so that we can login wiht ssh
4. Check Networks
5. Check EFI Boot Mode
The following should print out something if booted into UEFI Boot mode properly.
Or,
6. Set Clock correctly
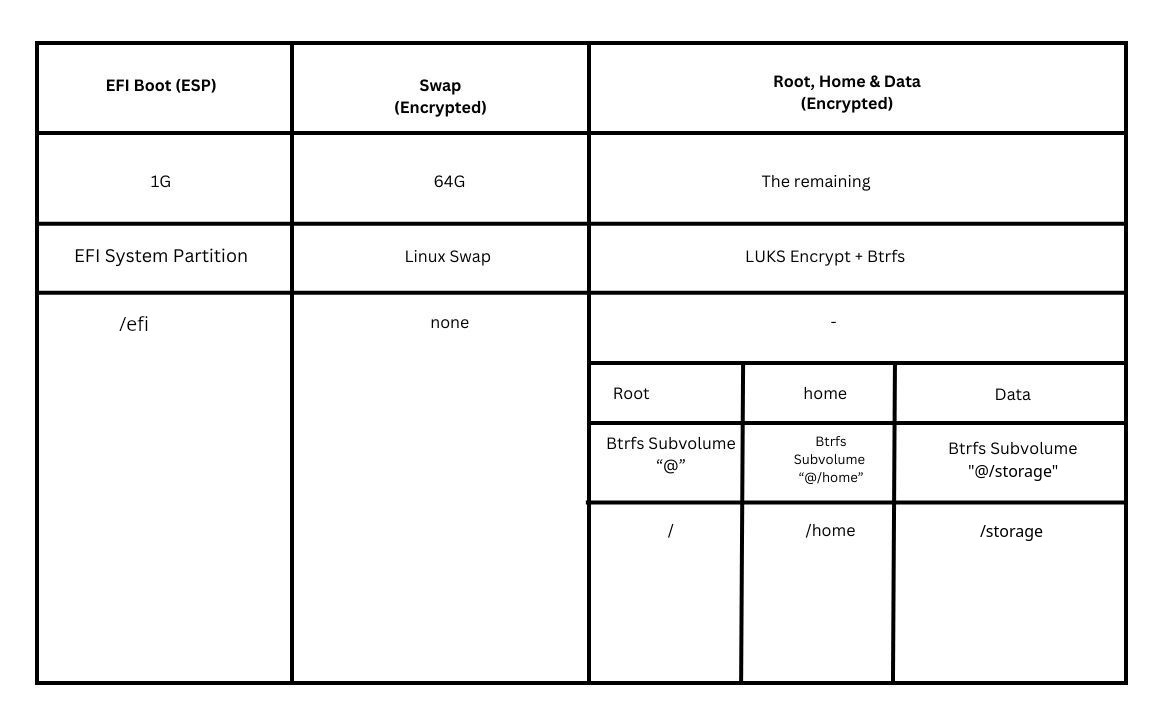
7. Disk Partitioning
- Note: As we will be using UKIs, the UKIs will be stored inside the esp. So, for multiple kernels 1G esp is not enough. If you want to use multiple kernels then make sure to use esp with at least 2G size.
Example partition table (For 1TB Drive)
- In total, 3 partitions.
- EFI Boot, Swap, The rest (Root, Home and Data)
- EFI Boot - 1G
- Swap - 64G
- Btrfs Partition - Around 888G Left
- Root
- Home
- Data
Example Partition Table
Check the correct disk
It should print out the disks and partitions they have. (i.e. “/dev/sda” in this example).
Partition with “cfdisk”
- Select label type “
gpt” - If required, Delete the existing partitions by selecting them and clicking “
Delete” - Create new 1 GiB Boot Partition with “
1G”. Set the Type to “EFI Filesystem” Set theBootableFlag. SetPrimary. Set the Label to “boot”. - Create new 64 GiB Swap Partition with “
64G”. Set the Type to “Linux Swap”. SetPrimary. Set the Label to “swap”. - Create new Partition with the rest of the space. Set the Type to “
Btrfs”. SetPrimary. Set the Label to “cryptpart”. - Write the changes.
- Done.
8. Prepare the partitions
Format the Boot Partition
Create encrypted swap partition
Use cryptsetup-luksFormat(8) to create the encrypted container for the swap partition:
# cryptsetup luksFormat --label swap /dev/sda2
Open the container to /dev/mapper/swap:
# cryptsetup open /dev/disk/by-label/swap swap
Create a swap filesystem inside the mapped partition:
# mkswap /dev/mapper/swap
If not using systemd#GPT partition automounting, add the mapped partition to /etc/fstab by adding the following line:
/dev/mapper/swap none swap defaults 0 0
To set up your system to resume from hibernation, use the resume=/dev/mapper/swap kernel parameter. See Power management/Suspend and hibernate#Pass hibernate location to initramfs for details.
See TPM keys stuff below.
Prepare Btrfs Partition
- Use
cryptsetupto setup encryption on the partition.
- Open the encrypted partition.
- Format the mapped device to
btrfs.
- Create
btrfs subvolumes.
See TPM keys stuff below.
9. Mount the Partitions
10. Install the base system
- Set the mirrors properly and change the pacman conf before installing the system for faster downloads.
- Also save the config inside the installation system.
- Enable pacman goodies.
# Add the following lines.
- Update the pacman database.
- Install the system
- Note: If using LVM, for LVM to work also install the
lvm2package with pacstrap. This will make thelvm2hook for mkinitcpio.
11. Generate fstab config
To verify that we can type
12. Configure the system in Chroot
Set Time-Zone
Set Localization
Set Language
Set Hostname
Set Root Password
Create New User
Set sudoers
# Uncomment or add the following line.
)
Setup /etc/hosts
13. Generate initramfs
- We want to create Unified Kernel Images, so first, let’s create our kernel cmdline file. This doesn’t need to contain anything because we’re using Discoverable Partitions, we just do it so
mkinitcpiodoesn’t complain:
- Let’s create the EFI folder structure:
- We need to change the
HOOKSinmkinitcpio.confto usesystemd, so make yours look like:
# vim:set ft=sh
MODULES=()
BINARIES=()
FILES=()
HOOKS=(base systemd autodetect modconf kms keyboard sd-vconsole sd-encrypt block filesystems fsck)
- And now let’s update the
.presetfile, to generate a UKI:
# mkinitcpio preset file to generate UKIs
ALL_config="/etc/mkinitcpio.conf"
ALL_kver="/boot/vmlinuz-linux"
ALL_microcode=(/boot/*-ucode.img)
PRESETS=('default' 'fallback')
#default_config="/etc/mkinitcpio.conf"
#default_image="/boot/initramfs-linux.img"
default_uki="/efi/EFI/Linux/arch-linux.efi"
default_options="--splash /usr/share/systemd/bootctl/splash-arch.bmp"
#fallback_config="/etc/mkinitcpio.conf"
#fallback_image="/boot/initramfs-linux-fallback.img"
fallback_uki="/efi/EFI/Linux/arch-linux-fallback.efi"
fallback_options="-S autodetect"
- And now let’s generate our UKIs:
14. Install the Bootloader
We are using systemd boot here.
15. Install packages
Install some basic packages
Nvidia propieretary stuff
16. Enable Services
17. Secure Boot
OK, let’s reboot, and then finish off the installation. Whilst you’re rebooting, head into your UEFI/BIOS and put Secure Boot into “Setup Mode”, you’ll need to check with your PC/Motherboard manufacturer for exact details on how to do that. Basically disabling Secure Boot should put it to “Setup Mode”.
Ok, now that we’ve rebooted and logged back in (we’re not in chroot anymore we’re inside the actual system), we need to first check that Secure Boot is in “Setup Mode”:
# If sbctl is not installed
# Optionally remove any leftover *.img files
Looks good. Let’s first create and enroll our personal Secure Boot keys:
We use the -m option to enroll the Microsoft vendor key as well as our self-created platform key. IF you’re sure that none of your hardware has any OPROMs signed by Microsoft, you can leave this option out. WARNING - Your system CAN get bricked if you’re mistaken. I know it sucks, but it’s usually safer to just install the Microsoft vendor key. YOU HAVE BEEN WARNED!!! :-)
Let’s use sbctl to sign our .efi files. We’ll sign the systemd-boot .efi file, and our UKI files which mkinitcpio is now generating for us. We’ll use the -s option so sbctl will automatically resign them for us when we update the kernel or bootloader through pacman:
- Quick Note: If we want to disenroll an efi binary from
sbctlfor signing, we can simply use the following command:
This will basically remove the efi binary from the sbctl database which will simply cause sbctl not looking for the efi binary for auto signing.
Let’s reinstall the kernel to make sure it resigns the UKI:
Looking good. Reboot your PC now, so the Secure Boot settings will get saved.
18. TPM2 Unlocking
Unlocking the Root filesystem with TPM2
Once rebooted we need to configure automatic unlocking of the root filesystem, by binding a LUKS key to the TPM. Let’s generate a new key, add it to our volume so it can be used to unlock it in addition to the existing keys, and bind this new key to PCRs 0 and 7 (the system firmware and Secure Boot state). First things first, let’s generate a recovery key in case it all gets messed up some time in the future:
Keep this key safe. Keep it hidden. Moving on, we’ll now enroll our system firmware and Secure Boot state. Normally, this would allow our TPM to unlock our encrypted drive, as long as the state hasn’t changed. If you’re particularly paranoid, you can add --tpm2-with-pin=yes, so we get prompted for a PIN code on boot.
- In terms of using PCRs the default recomendation is
0+7:
- But I like to do PCRs
0+1+2+7+11+13+15:
See about TPM PCRs to learn more about them.
Unlocking the Swap filesystem with TPM2
The following provides unattended swap decryption with a key stored in the TPM.
You can use systemd-cryptenroll to enroll the key to the Luks container and TPM, and wipe the previously created keyslot containing the password:
#Syntax
# Example
Check the result with
19. Reboot
Now we need to reboot and test this. If all goes well, we should be able to unlock our encrypted root partition with just a PIN code.
20. Install the DE
21. Important packages and tweaks (Post Install)
- Some packages
- Fonts
- Printing
- Thumbnails
# If something doesn't work, we can try this
- AUR packages
- Install AUR helper
- Install AUR packages
- Codecs and Multimedia
# First try this
# If see errors, then try this
# If still see errors, then try this
# If you still see errors, then try this
- Flatpaks
- Install OhMyZsh
- Fix Plasma not respecting
/etc/locale.conf
- Enable services
- For NVIDIA stuff see: Get Nvidia working
Done!